Raid on Asluj to Hafir el Auja railway on:
[Wikipedia]
[Google]
[Amazon]
The Raid on the Beersheba to Hafir el Auja railway took place on 23 May 1917 after the Second Battle of Gaza and before the Battle of Beersheba (1917), Battle of Beersheba during the Stalemate in Southern Palestine in the Sinai and Palestine Campaign of World War I.
Substantial sections of the Ottoman Empire, Ottoman railway line which ran south from Beersheba to Auja al-Hafir, Hafir el Auja were attacked and demolished by working parties of the Royal Engineers of the Anzac Mounted Division, Anzac and Australian Mounted Division, Imperial Mounted Divisions and the Imperial Camel Corps Brigade reinforced with men from the 1st Light Horse Brigade. They destroyed bridges, and rails between Asluj and the main Ottoman Desert Base at Hafir el Auja also known as Auja al-Hafir in the south. While the demolition force completed their work, the Imperial Mounted Division demonstrated against Beersheba covered by the Anzac Mounted Division on their right.
 Although the railway bridge at Irgeig north-west of Beersheba was bombed by aircraft on 22 December 1916 when the bombs hit their target, the solid, strongly built bridge was found to be virtually indestructible from the air.
During a raid on the wells south of Beersheba between 7 and 14 May 1917, Nos. 2 and 16 Companies, Imperial Camel Brigade, a detachments of field troop and two motor ambulances, attacked the railway line between Beersheba and Hafir el Auja. The camels rode out from the Lines of Communication Defences Force via Kossaima when they blew up wells and a stone bridge. They also attacked a train near Hafir el Auja when five Ottoman railwaymen were captured. These prisoners said they had orders to pick up rails south of Hafir el Auja for use on "a new branch [railway line] from Et Tine to supply the front at Gaza," leaving the railway between Hafir el Auja and Beersheba intact.Falls 1930 Vol. 1 p. 363 The line south from Hafir el Auja had almost reached the Wadi el Arish by December 1916.See Battle of Magdhaba and Battle of Rafa.Powles 1922 p. 110
 While the railway line south from Beersheba to Hafir el Auja remained intact, it represented a constant threat to the long British Empire lines of communication stretching from Egypt, across the Sinai via El Arish to south of Gaza.Keogh 1955 p. 126 Meissner, who had been involved with the building of the Baghdad Railway, constructed the railway, which crossed numerous wadis on "fine, arched bridges of dressed stone." This railway could very quickly at any time, be used to transport large numbers of Ottoman troops to Hafir el Auja which remained available for use as a base. The early May patrol had found well built stone buildings, barracks, a hospital and a large water reservoir at Hafir el Auja, which Friedrich Freiherr Kress von Kressenstein, Kress von Kressenstein had been forced to abandon in January as the EEF advanced up the coast to Rafa.Wavell 1968 p. 90 From their base at Hafir el Auja a substantial attacking force could be supplied by the railway and housed many miles behind the Egyptian Expeditionary Force front line.
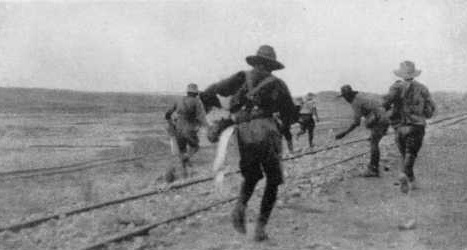 Chaytor's northern column reached Asluj at 07:00 on 23 May and by 10:00 had set and exploded charges cutting in half alternate rails on both sides of the railway line for . The 18-arch Ashlar bridge at Asluj was also destroyed. Here every second arch was blown up. Meanwhile, the Imperial Camel Brigade, following the line of the frontier to Hafir el Auja was delayed. They arrived at 11:45 to begin demolitions along of railway line including seven bridges.
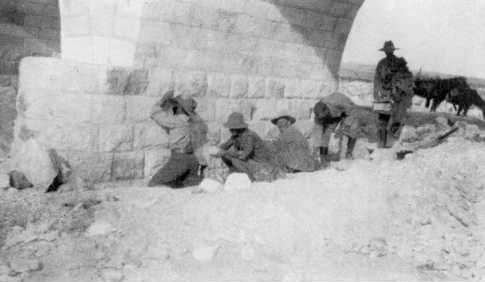 The led horses were followed by the two teams of dismounted demolition men moving in single file at the walking pace. Setting the explosive charges began with the leading man placing a slab of Nitrocellulose, gun cotton in the middle of a rail and then, missing a rail, to repeat his action, while the leading man of the second team put down a slab of gun cotton in the middle of the rail on his side which paired with the rail missed by the other team. The next man of both teams then wired the gun cotton to the rail and walked on to the next prepared rail, while the third man put into the gun cotton the detonator and fuse and the fourth man lit the charge. Each squadron blasted a piece of rail along the . In this way about of railway line was destroyed. The bridges were wrecked by placing gun cotton charges on alternate arches and firing the charges electrically. All demolitions were complete by 13:00 when the units returned to their bivouacs.
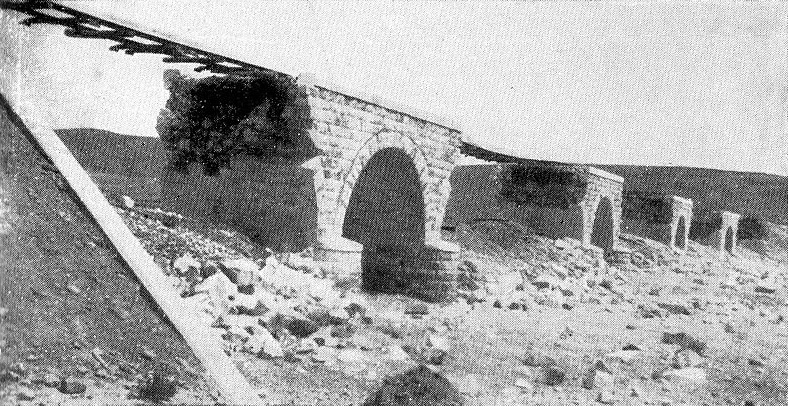 The Imperial Camel Brigade fired the timed and instantaneous fuses together to destroyed "[a]pproximately of single track (each rail being destroyed at centre) beginning about E of Auja and destroying rails to within of Wadi Abiad Bridge." The six-span bridge over the Wadi Husaniya was "totally demolished" while seven piers and eight arches of the twelve-span bridge over the Wadi Abiad were demolished. They continued working till 17:00 when they withdrew with their escorts.
Before noon on 23 May of railway line and six bridges had been wrecked. The raid was completely successful. Both columns returned to their base without being attacked. A many-arched and substantial stone railway viaduct was completely demolished with explosives, several miles of line being destroyed in the same way, thus isolating what remained intact of the railway to the south.Moore 1920 p.73
Background
 Although the railway bridge at Irgeig north-west of Beersheba was bombed by aircraft on 22 December 1916 when the bombs hit their target, the solid, strongly built bridge was found to be virtually indestructible from the air.
During a raid on the wells south of Beersheba between 7 and 14 May 1917, Nos. 2 and 16 Companies, Imperial Camel Brigade, a detachments of field troop and two motor ambulances, attacked the railway line between Beersheba and Hafir el Auja. The camels rode out from the Lines of Communication Defences Force via Kossaima when they blew up wells and a stone bridge. They also attacked a train near Hafir el Auja when five Ottoman railwaymen were captured. These prisoners said they had orders to pick up rails south of Hafir el Auja for use on "a new branch [railway line] from Et Tine to supply the front at Gaza," leaving the railway between Hafir el Auja and Beersheba intact.Falls 1930 Vol. 1 p. 363 The line south from Hafir el Auja had almost reached the Wadi el Arish by December 1916.See Battle of Magdhaba and Battle of Rafa.Powles 1922 p. 110
 While the railway line south from Beersheba to Hafir el Auja remained intact, it represented a constant threat to the long British Empire lines of communication stretching from Egypt, across the Sinai via El Arish to south of Gaza.Keogh 1955 p. 126 Meissner, who had been involved with the building of the Baghdad Railway, constructed the railway, which crossed numerous wadis on "fine, arched bridges of dressed stone." This railway could very quickly at any time, be used to transport large numbers of Ottoman troops to Hafir el Auja which remained available for use as a base. The early May patrol had found well built stone buildings, barracks, a hospital and a large water reservoir at Hafir el Auja, which Friedrich Freiherr Kress von Kressenstein, Kress von Kressenstein had been forced to abandon in January as the EEF advanced up the coast to Rafa.Wavell 1968 p. 90 From their base at Hafir el Auja a substantial attacking force could be supplied by the railway and housed many miles behind the Egyptian Expeditionary Force front line.
Prelude
Lieutenant General Philip Chetwode commanding Eastern Force, ordered the destruction of large sections of this railway line.Attacking force
The attacking force was organised into two columns * under the command of Edward Chaytor, commanding Anzac Mounted Division, the Engineers in the 1st Australian Field Squadron (Anzac Mounted Division) and the Imperial Mounted Division Field Squadron, escorted by the 1st Light Horse Brigade rode from Shellal via Al-Khalasa, Khalasa to Asluj south of Beersheba.Powles 1922 p. 111 * the Brigade Field Troop of the Imperial Camel Corps Brigade escorted by their brigade rode from Rafa to Hafir el Auja. The camel brigade rode along the Darb el Hager, the only possible way for a large body of troops moving from Rafa, along a plain between two banks of sand dunes. Their flank guards and patrols had considerable difficulty getting across the dunes as they rode along the boundary posts, which indicated the frontier between Egyptian Sinai Peninsula and Ottoman Southern Palestine. While the raid took place, the Imperial Mounted Division made a demonstration to the south west of Beersheba and a wire-cutting bombardment was directed on the Gaza defences.Demonstration south west of Beersheba
On 20 May the 3rd Light Horse Brigade (Imperial Mounted Division) received orders to "attract the attention of enemy at Bir Saba from the raid on railway line." A 60 pounder battery was attached to the division. The brigade marched with their Machine Gun Squadron, Notts Battery, ammunition column and field ambulance from Abasan el Kebir to Gamli on 21 May carrying their cardigan jackets, the men's blankets under the saddle, one day’s iron ration and forage on the horse. One day's supplies "on the mobile scale" were to be dumped at Gamli to be pick up on their way back. Water was to be obtained at Gamli and "full use...[was to]...be made of any water discovered during operations". All ranks had to make the water they carried "last through the day," though full water carts accompanied the march.Demolition squads
Within the 1st Light Horse and the Imperial Camel Brigades special demolition parties were trained to assist the Royal Engineers. The Engineers in the Anzac and Imperial Mounted Divisions Field Squadrons and the Australian Field Troop attached to the Imperial Camel Corps Brigade, were reinforced by about 100 men from the mounted regiment who received intensive training in railway demolitions over a few days. The Anzac Demolition Squadron were composed as follows: a) two rail demolition parties consisting of one officer and 53 other ranks with 10 pack horses and two half limbers carrying explosives b) one bridge demolition party consisting of two officers and 70 other ranks with two pack horses and three half limbers carrying explosives.Anzac Mounted Division War Diary May 1917 AWM4-1-60-15part1 Appendix 119 J. H. Alexander, Field Squadron Report p. 1Advance to Ottoman railway
Both columns rode out during the night of 22/23 May. Chaytor's column rode out at 19:00 on 22 May, with Chaytor travelling in a sand-cart due to ill health. As they marched through the night a khamsin (also known as ''khamaseen'') wind full of dust and electricity, blew from the south into their faces so the troops had difficult seeing and breathing. "A horse's mane on being stroked gave forth a shower of sparks." Chaytor's column consisting of the 1st Light Horse Brigade, 6th Light Horse Regiment and Demolition Field Squadrons of the Anzac and Imperial Mounted Divisions and Desert Column's cable cart which was to lay cable to Hill 820, left camp at Tel el Fara at 15:00 on 22 May to arrive at Esani at 18:00 where they rested for two hours. (During the day the Heliograph, helio communication was problematic but the cable communication with Desert Column worked well.) The Anzac Mounted Division less Chaytor's column left Esani for the assembly point near el Gamli at 19:30. At Esani the demolition squads divided into separate groups and with their allotted escort regiments left Esani at 20:00 to travel to the Asluj to Hafir el Auja railway line via the Police Post at Asluj.Anzac Mounted Division War Diary May 1917 AWM4-1-60-15part1 Appendix 119 Chaytor's Report p. 1 The Anzac Mounted Division arrived near Hill 820 at 02:00 but could not locate it. Instead, the division less the 1st Light Horse Brigade and Demolition party was established at Hill 770 to the south of Hill 820. The mistake was discovered later but the division remained at Hill 770 for the day. The New Zealand Mounted Rifles Brigade and the 2nd Light Horse Brigade took up a position at 02:30 facing east on the far side of the Wadi Ghuzzee. Khalasa had been surrounded and guarded while the division moved past and subsequently the 2nd Light Horse Brigade took up the line Asluj to Goz Sheihili in touch with the 1st Light Horse Brigade on their right and the New Zealand Mounted Rifles Brigade on their left which brigade was in touch with the 2nd Light Horse Brigade. The 2nd Light Horse Brigade eventually found in touch with the 3rd Light Horse Brigade, Imperial Mounted Division on their left. Only the 2nd Light Horse Brigade was opposed just after daylight by armed Bedouin, one was killed and the others were taken prisoner.Destruction of railway
At daylight on the 23 May the New Zealand Mounted Rifle Brigade was north of the planned demolition site and in touch with the Imperial Mounted Division, which was to demonstrate against the Beersheba line and prevent any Ottoman troops attempting to stop the destruction of the railway. Only a few snipers tried to interrupted the work. Chaytor's northern column reached Asluj at 07:00 on 23 May and by 10:00 had set and exploded charges cutting in half alternate rails on both sides of the railway line for . The 18-arch Ashlar bridge at Asluj was also destroyed. Here every second arch was blown up. Meanwhile, the Imperial Camel Brigade, following the line of the frontier to Hafir el Auja was delayed. They arrived at 11:45 to begin demolitions along of railway line including seven bridges.
 The led horses were followed by the two teams of dismounted demolition men moving in single file at the walking pace. Setting the explosive charges began with the leading man placing a slab of Nitrocellulose, gun cotton in the middle of a rail and then, missing a rail, to repeat his action, while the leading man of the second team put down a slab of gun cotton in the middle of the rail on his side which paired with the rail missed by the other team. The next man of both teams then wired the gun cotton to the rail and walked on to the next prepared rail, while the third man put into the gun cotton the detonator and fuse and the fourth man lit the charge. Each squadron blasted a piece of rail along the . In this way about of railway line was destroyed. The bridges were wrecked by placing gun cotton charges on alternate arches and firing the charges electrically. All demolitions were complete by 13:00 when the units returned to their bivouacs.
 The Imperial Camel Brigade fired the timed and instantaneous fuses together to destroyed "[a]pproximately of single track (each rail being destroyed at centre) beginning about E of Auja and destroying rails to within of Wadi Abiad Bridge." The six-span bridge over the Wadi Husaniya was "totally demolished" while seven piers and eight arches of the twelve-span bridge over the Wadi Abiad were demolished. They continued working till 17:00 when they withdrew with their escorts.
Before noon on 23 May of railway line and six bridges had been wrecked. The raid was completely successful. Both columns returned to their base without being attacked. A many-arched and substantial stone railway viaduct was completely demolished with explosives, several miles of line being destroyed in the same way, thus isolating what remained intact of the railway to the south.Moore 1920 p.73
Aftermath
All the demolition work was complete by Chaytor's column by 10:20 when they withdrew. By 14:20 their demolition teams and the 1st Light Horse Brigade were seen passing Hill 860 just north of Khalasa. After they cleared the line the 2nd Light Horse Brigade began to drop back through Khalasa with the New Zealand Mounted Rifles Brigade covering the withdrawal to Esani where the force watered and fed before riding back with the New Zealand Mounted Rifles Brigade as rearguard. The whole force marched back to Tel el Fara camp. During the retirement crops were burned by the 2nd Light Horse and the New Zealand Mounted Rifles Brigades estimated to be 110m tons. Thirteen prisoners were captured.Yigal Sheffy suggests that the success of this raid, resulted in the change of focus for the next EEF offensive, from Gaza to Beersheba. [Y. Sheffy, ''The Origins of the British Breakthrough into South Palestine: The Anzac Raid on the Ottoman Railway, 1917'' in ''Journal of Strategic Studies,'' Volume 22, Issue 1 March 1999, pages 124–147]Notes
Citations
References
* * * * * * * * * * * {{DEFAULTSORT:Beersheba to Hafir el Auja railway, Raid on 1917 Conflicts in 1917 1917 in British-administered Palestine Battles of the Sinai and Palestine Campaign Battles of World War I involving Australia Battles of World War I involving New Zealand Battles of World War I involving the United Kingdom Battles of World War I involving the Ottoman Empire May 1917 events