Symbols And Conventions Used In Welding Documentation on:
[Wikipedia]
[Google]
[Amazon]
 The symbols and conventions used in welding documentation are specified in national and international standards such as ISO 2553 ''Welded, brazed and soldered joints -- Symbolic representation on drawings'' and ISO 4063 ''Welding and allied processes -- Nomenclature of processes and reference numbers''. The US standard symbols are outlined by the
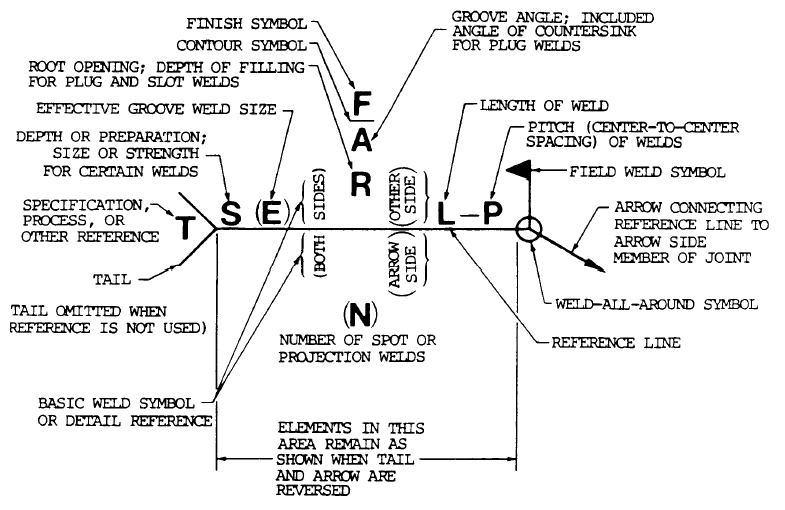
 In the US, the component elements of the weld specification are:
# The reference line - the body of the arrow which is the baseline for the specification.
# The arrow tip which goes at an angle to the reference line, pointing to the joint to be welded.
# The tail which goes at the other end of the reference line.
# The basic welding symbol which goes on the reference line to indicate the shape of the weld such as a fillet or plug. The symbol is placed on the arrow side or other side of the line to indicate which side of the joint the weld goes.
# The dimensions and other numbers such as the length of the weld or number of spot welds go above and below the reference line.
# Supplementary symbols go at the junction of the reference line and the arrow tip. One such symbol is a circle to indicate an all-around weld, which goes on every side of the joint.
# Finish symbols go above the reference line to indicate the surface contour or finish of the weld such as flush, convex or concave.
# Letters indicating the welding process are placed at the tail end, such as AHW for
Welding symbols
at Arcraft Plasma Ltd.
at Metallic Fusion
at Engineer's Edge
Extract from Chapter 26 – Welding and welding symbols
in ''Manual of Engineering Drawing'' by Colin H. Simmons and Dennis E. Maguire. Newnes (2004). {{ISBN, 0-7506-5120-2 Notation Standards Welding
American National Standards Institute
The American National Standards Institute (ANSI ) is a private non-profit organization that oversees the development of voluntary consensus standards for products, services, processes, systems, and personnel in the United States. The organi ...
and the American Welding Society and are noted as "ANSI/AWS". Due in part to the growth of the oil industry, this symbol set was used during the 1990s in about 50% of the world's welding operations. An ISO committee sought to establish a global standard during this decade.
In engineering drawing
An engineering drawing is a type of technical drawing that is used to convey information about an object. A common use is to specify the geometry necessary for the construction of a component and is called a detail drawing. Usually, a number of ...
s, each weld is conventionally identified by an arrow which points to the joint to be welded. The arrow is annotated with letters, numbers and symbols which indicate the exact specification of the weld. In complex applications, such as those involving alloys other than mild steel
Carbon steel is a steel with carbon content from about 0.05 up to 2.1 percent by weight. The definition of carbon steel from the American Iron and Steel Institute (AISI) states:
* no minimum content is specified or required for chromium, cobalt ...
, more information may be called for than can comfortably be indicated using the symbols alone. Annotations are used in these cases.
Component elements
atomic hydrogen welding
Atomic hydrogen welding (AHW) is an arc welding process that uses an arc between two tungsten electrodes in a shielding atmosphere of hydrogen. The process was invented by Irving Langmuir in the course of his studies of atomic hydrogen. The elec ...
. Further examples include:Abbreviations for welding processes
If a particular welding process needs to be indicated in addition to the symbols, the following abbreviations are commonly used in North America:"Welding Inspection Handbook", 3rd edition, American Welding Society, , Miami, FL, pp. 10-11 (2000)References
Further reading
* *External links
Welding symbols
at Arcraft Plasma Ltd.
at Metallic Fusion
at Engineer's Edge
Extract from Chapter 26 – Welding and welding symbols
in ''Manual of Engineering Drawing'' by Colin H. Simmons and Dennis E. Maguire. Newnes (2004). {{ISBN, 0-7506-5120-2 Notation Standards Welding